Saturday, June 30, 2012

Gardener in Training

Many parents will use a pet (dog, cat, fish, hamster, etc.) as a method to teach their kids responsibility.  I disagree with this method because you, as the parent, are unlikely to let that pet die should your child not be responsible.  You're the one now taking care of the pet.  In my opinion, a better method of teaching your child responsibility is teaching them how to garden.  This is fantastic, long term activity that teaches your child how produce they see in the grocery store is grown.

Although I'm not doing this right now, I plan, in a year or two, to let my daughters grow one plant of their own.  It will be their responsibility to water, feed, and weed this plant.  Since they only have one plant, letting them fail is an option.  The plant may die, but they'll learn something, and I still have the rest of the garden producing produce.

I have a 16' x 16' foot garden in my back yard where we grow tomatoes, green beans, zucchini, and peppers.  I'm a huge fan of tomatoes and salsa, so the tomatoes and peppers are grown each year, while the remaining ground changes.  This summer my daughter is old enough to understand the basics of gardening so I've been using her to help me with basic gardening.  She helped plant, fertilize (organic fertilizer), water, and weed.  Along the way I ask her why we do these things.  Why do the plants need watered on a regular basis?  What is the purpose of fertilizer?  Why do we not like weeds in the garden?  Teaching her about gardening introduces her to the path that food takes before it arrives on our plate.

My garden as it looked 2 weeks ago.
If your kids are anything like mine, they'll be excited when the first vegetables start to ripen.  My daughter has been eager for a couple of weeks to pick a tomato that was ripening.  The smile she gave me after I let her pick it made me appreciate how wonderful it is to be a father.

Our first tomatoes of the year.

If you've never tasted a home grown tomato, you are missing out.  They are delicious and taste nothing like the bland, tasteless things they call tomatoes at the grocery store.  You're kids will notice this immediately and it's the same for all vegetables.  My daughter loves eating home grown tomatoes and green beans, but it's hard to get her to eat the store bought versions.  This is another reason to build and grow your own garden.

If you don't have the space for a 16' x 16' garden like mine, don't worry, there are plenty of other options.  As a grad student my wife and I lived in an apartment in a large city.  Our apartment had a patio/deck so we grew 2 tomato plants each year in large buckets.  No deck/patio?  You can also grow tomato plants in your window.  The plant will be smaller, but you'll still get delicious tomatoes and your kids will greatly appreciate your efforts.  

Never gardened before and not sure where to start?  Again, don't worry.  There are plenty of web resources to get you started.  I started small with two pots and two tomato plants.  I learned by trial and error and slowly built a bigger garden.  You don't need to be an master gardener to teach your kids how to garden.  Just jump right in and you'll get better with time.  Good luck!

Friday, June 29, 2012

Kids Love Paper Airplanes

Looking for a low cost activity for you and your child?  Try making paper airplanes.  If you and your child have never made paper airplanes together, you're definitely missing out on some fun.  I set up a paper airplane making activity in my summer camp this week for 3rd - 5th graders.  My oldest daughter had the opportunity to join me for the day and had a blast watching the other kids build planes and building her own.

If you're not very good at making paper airplanes, don't worry.  Neither am I.  There are several web sources instructing you how to design different planes, but this really isn't needed.  Let you children start on their own.  Who cares if the plane looks like it will immediately nose dive when released.  The point of this exercise is to get your kids thinking about what is required to make a plane fly.  Ask them questions about their planes.  What does this piece do?  Why did you design it like this?  I asked my students these questions and they had a ton of reasons for their designs.

Making the planes is the first step, but you can make it more interesting for you child if you make a game out of it.  Which plane will fly the farthest?  Which plane will fly the highest?  Which plane spends the longest in the air?  Which plane does the coolest trick?  Which plane was most creative?  My students had a blast with this and took pride in designing planes that would be the best at something.  Here's a picture I took of a couple of planes these students made:

Paper Airplanes
These planes may not look like much, and in some cases they did very poorly in flight, but kids will quickly learn what works well and doesn't work well.  That's science!  These kids (and yours) will learn from their failures in making paper airplanes.  You can't be successful if you haven't first experienced failure.

Thursday, June 28, 2012

Egg Drop Experiment

Today my summer camp students finished their egg drop experiments.  If you've never done this before it is an excellent activity for kids of most ages.  I say most ages because I think I will wait another year or two before doing this with my daughter.  Some skill in building using popsicle sticks is required.  I've done this experiment with kids as young as 2nd grade and as old as seniors in high school.

So what's the egg drop experiment?  The basic idea is that you have select materials to build a "ship" that will house an egg (regular, not hard boiled).  Once the ship is built and the egg in place, you drop the ship from increasing heights until the egg breaks.  The goal is to go as high as possible before breaking the egg or better yet, not break the egg at all.

There are a number of websites that discuss the egg drop experiment, all with different materials.  My students this week were allowed to use the following and only the following materials:

15 cotton balls
23 popsicle sticks
6 straws
6 rubber bands
6 paper clips
7 pipe cleaners
2 feet of string
1 plastic grocery bag
1 bottle of basic glue.

Here are their "ships".


After letting the glue dry for a day we headed out to a nearby parking garage and dropped them from a few feet.  All eggs survived the first drop.  After dropping from the second floor, 4 of the 8 eggs survived.  2 eggs survived the 3rd and 4th floor drop.  1 egg survived the drop from the fourth floor onto rocks.  This same egg survived the upside down drop and the throw down drop.  Which ship was this?  In the last picture on the right with the green pipe cleaners is the ship that protected its egg on all drops.

The kids today had a blast and so will your kids.  If you have older kids, make it more challenging by limiting their supplies.  For my high school students I take away the grocery bag (so no parachute), a few cotton balls, and a a few popsicle sticks.

So if you and your kids are bored sometime, give this experiment a try.  It will definitely entertain.

Wednesday, June 27, 2012

North Carolina Trip Part III: The Beach

It's been several days since I posted about my family's trip to the Atlantic Coast earlier this month.  In an earlier post I talked about Ocean Tides.  Here I want to focus on some of the disadvantages of the beach.  Don't get me wrong, this was a fantastic trip, but the beach does have its disadvantages.  Here are two that my daughters and I picked up.

1.  Salt water.  This was the first experience with salt water for both of my daughters.  It's salt water, so obviously it tastes salty, or icky depending on your age.  My one year old scrunched up her face after the first taste!  The salt water also stings your eyes.  My daughters didn't have to worry about this because they are a bit too young to be jumping into the waves.  I'm thankful for this too because I can only imagine the temper tantrums if they did get salt in their eyes.  If you are ever on an ocean beach, take time to explain why the water is salty and different from regular water.  Not sure why?  Here's a nice explanation that includes an experiment to try.  I think I need to add this to this summer's activity list.

2.  Sand.  EVERYWHERE!  And I'm not just talking about sand on the beach.  This is probably less of a problem if you have older kids, but mine are 5 and 1 and they ended up with sand everywhere.  Despite multiple showers, they still had a few grains of sand in their hair when we made it back home.  Our beach chair bags were full of sand.  On one of our trips to the beach I let my kids bury me in sand.  It sounded cool at the time, but sand grains stuck to every inch of my body.  After taking a shower I thought that I removed all the sand, only to look at my arms and still see sand grains everywhere.  It took 3 showers to remove them all!  I did a bit of research and supposedly using baby powder works very well to remove sand.  I'll have to try that the next time we go to the beach.

The beach vacation was fantastic and there were opportunities to discuss science with my kids, but I could have done without the salt water and especially the sand.  Then again, it's not much of a beach without sand!

Tuesday, June 26, 2012

Marshmellow Launch

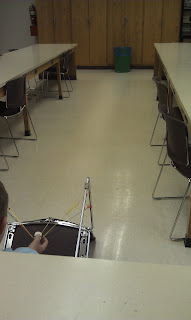
Another cool, summer science activity I plan to do with my daughter is the Marshmellow Launch.  I found this activity from Fascinating Science Activities for Kids.  I tested it out this week in my summer camp class for 3rd - 5th graders.  The basic idea is to create a catapult or slingshot using rubber bands.  It seems like an easy project but creating a slingshot that launches a marshmellow accurately each time is very difficult, as we quickly found out.  The sling shot needs to have a "bucket" for the marshmellow to sit in and the trick is making the bucket stable.  If the bucket tilts or flips around during launch, the marshmellow may not launch or it may launch in a different direction.  This happened for most of our marshmellow launchers.  One launcher, however, did much better than the others, so I snapped a few pictures of it.

Marshmellow Launcher

Ready to launch!

Goal = bucket in back.
This launcher worked the best because the "bucket" was stabilized by the four sets of rubber band cables.  Those stabilized with only two cables did not fare as well.  We launched many marshmellows but only one of them landed in the goal and that was a ricochet off the back wall!

I haven't yet tried this activity with my daughter, but it's on the list.  I learned many lessons from this class and have several new ideas on creating more accurate launchers.  This is an activity that works for older kids as well.  Simply ask them to make more elaborate launchers.  I will add that watching a launched marshmellow is very cool.  Since a marshmellow is squishy, it changes shape while in the air and it's easy to pick out the change in shape with your eye.  

Good luck launching!

Monday, June 25, 2012

Pop Explosion Info

This week I'm teaching a summer camp for 3rd - 5th graders.  One of activities today was the Exploding Soda Experiment.  For today's class I bought several varieties of soda to determine which produced a more impressive explosion by height.  Although soda shot out of the Sprite* and Diet Sprite* bottle, they were less than impressive.  Coke* was somewhat impressive, but the two that shot the highest were Diet Coke* and Diet Root Beer*.

*These were not name brand sodas, so it was the store brand version of Coke, Diet Coke, etc.  The kids were a bit disappointed after the Spirte and Diet Sprite, but sprang back to attention after being shocked by the height of the Diet Coke spray.  

Saturday, June 23, 2012

Misleading Intro to Experiment

While browsing the web for kid friendly science activities for my daughters I came across an activity page from a reputable company featuring the egg balancing activity.  As I previously mentioned in my Balancing an Egg Myth blog entry, the alignment of the Sun and Earth has nothing to do with balancing an egg.  Balancing an egg is all about center of mass.  Give it enough time and you will balance an egg.  It doesn't matter what time of day, day of the year, or location on Earth.  So imagine my surprise when I encountered this "reputable" website feature the egg balancing experiment with the following introductory words:

"Balance an egg on its end with some skillful coordination, a little salt—and maybe even a little help from the sun's gravitational pull!"


This introductory statement doesn't directly state that the Sun's gravitational pull plays a significant role, but it certainly implies it.  After reading through the procedure I was shocked to see the following:


"Some people believe that the gravitational pull of the sun that occurs on the equinoxes can help keep an egg standing on its end. This idea is unproven, but it's interesting to test it. Another way to stand an egg up—on any day—is to use salt."


What's wrong with this statement?  For starters, saying that "this idea is unproven" is a weak statement.  It leads one to conclude that the balanced egg could be a result of the Sun's gravitational pull, but that we haven't tested it enough to verify.  But it has been tested and tested by children all over the world.  Balance an egg on end any day of the year other than the two equinoxes (first day of spring and first day of fall) and you've proven that the Sun's gravitational pull plays no role.  


The other misleading item is this statement is the mentioning of salt.  It implies that you can balance an egg on any day of the year as long as you have salt.  Sorry, but salt is not needed to balance an egg.  I've done this every year with my students for 6 years running and we've never used salt.  To top that, we've managed to balance several eggs on the narrow end, with no salt in sight.  


This website has a number of what appear to be excellent science activities for kids, but if the others are similar to the egg balancing experiment, they are filled with misleading statements that will only work to teach children incorrect science.  Very disappointing.  


The moral of this story is to be careful.  Even reputable websites can be wrong.  

Friday, June 22, 2012

Water Bottle Rocket Launch

As you can see, the theme this week is explosions and rockets.  Earlier in the week my daughters and I dropped Mentos candy in 2 liter bottles of soda and watched the soda explode out of the bottle.  The next day my older daughter and I launched model rockets.  See my previous Corn Field Walk blog post for full details.  The latest explosion/launch activity required a recycling of the two liter soda bottle from the Soda Explosion experiment.  

Water bottle rockets are fairly easy to make.  You need a bottle (2 liter, 20 ounce, 16 ounce, etc.) filled approximately half full with water.  If you have a way to seal the bottle top and pump air into the bottle, then you have the opportunity for a water bottle rocket launch.  The trick is sealing the cap so air doesn't escape.  There are several methods to do this and if you Google search for "Water Bottle Rockets" or "Water Bottle Launcher" you will find several different designs.  Some assembly is required as you'll see.  I decided to take the easy way out and bought a water bottle rocket launcher off Ebay for about $20, shown below.

Water Bottle Launcher

Fill the bottle 1/2 full

The bicycle pump was not included, so you'll need one of those.  So what launches the rocket?  The answer is air!  Due to the water tight seal, neither air nor water can escape the bottle.  As air is pumped into the bottle via the bicycle pump, the pressure inside the bottle builds up.  If it builds up enough, the bottle will push itself off the seal and fly very high in the air.  The tighter you put the bottle on the seal, the greater the pressure needed to blow it off and the greater the height it will reach.  Here's the video of one of our launches.  The launch was too quick to catch the bottle in the air, but you should get the idea watching the video.


This is a great follow-up experiment to the soda explosion.  Both of my daughters were with me to help out and they got a big kick out of the bottle flying very high in the air.  Although you shouldn't stand too close, as long as you aren't very far away, you'll likely get sprayed from the bottle.  This is very nice on a hot day.

There are several ways to design your rocket.  Some involve one bottle, others two.  As you saw from the video, we simply attached the bottle to the launcher and let it fly.  In terms of aerodynamics it was very poor, but check the web for instructions on building more aerodynamic water bottles by adding fins and cones to make it look more similar to a real rocket.  Have fun!


Wednesday, June 20, 2012

Rocket Launch II: Tromping Through a Cornfield

Yesterday my daughter and I built our second rocket.  This one required a bit of painting, and as you can see in the image below, she used every color of paint we had!

The "Soccer Ball" rocket.

She named this rocket "Soccer Ball" since we were launching from a soccer field and there was a chance the rocket might go into a net.  This rocket also has a rated maximum height of twice that of the rocket we launched last week.  It's less massive so I figured it would go higher, but I was a bit skeptical that it would go twice as high.  We launched 4 times, each with a more powerful engine.  We began with a starter engine to see high it would go and how the wind would affect the fall.  Then we launched with two medium level engines with no problems.  Watching the first three launches, I told me daughter that it's going higher than the first rocket, but not as high as I thought it would go.  Below is the video of one of these launches.


Then we loaded the most powerful engine and let it fly.  And fly it did!  Once it was way up in the air my daughter commented that the parachute didn't come out.  I had to tell her that's because it was still going upward!  The parachute did finally open, and although I moved the launch pad to compensate for the wind, it flew past the soccer fields, halfway into the adjacent cornfield.  This began our next adventure...tromping through a cornfield.  The corn was taller than my daughter and in some rows, as tall as me.  We walked, and walked, and walked, and just as I was about ready to give up, we saw it.  Phew!

I grew up surrounded by cornfields, but I've never walked through one until today!  I had no intention of walking my daughter through a cornfield, but now she has a cool story to tell her friends.

Rocket launching is an excellent science activity for you and your kids.  My daughter loves it and gets excited whenever I tell her that we'll be launching rockets.  And I'll be honest, I get just as excited, if not more excited, than her!

Tuesday, June 19, 2012

Exploding Soda Pop

Today my daughters and I set out to do the exploding soda pop experiment.  This is a fairly common experiment, but if you've never done it before, it's very simple.  You need a two liter bottle of any carbonated soda and a pack of Mentos candy.  The experiment only works once per two liter bottle of soda.  Feel free to buy the cheap store brand soda.  That's what I did.  Take the cap off the soda.  Place the bottle on flat ground.  Drop 6 pieces of Mentos candy into the bottle.  Back away very quick because the soda will soon shoot upward.  Below is the video I took this afternoon of our first attempt.  In the video I say carbonated water, but it's obvious that this is soda.


I rolled up a standard sized sheet of paper to serve as a funnel.  This allows you to drop them all in at once, which you need to do, unless you want soda in your face.  It's difficult to drop 6 Mentos candy pieces in at once if there's no funnel.  Not all of the soda is shot out of the bottle.  About 1/3 of the soda is left, along with the Mentos pieces.

Leftover soda in the bottle.
Mentos pieces remain in bottle (4 shown).
The remaining soda has lost its carbonation, so the experiment does not work a second time.  I wouldn't recommend drinking the remaining soda.  It probably tastes flat.  I wouldn't recommend eating the leftover Mentos pieces either, but the choice is yours!  :-)

This is a short-lived explosion, but kids love it.  My daughter refused to let me drop the Mentos pieces in our second bottle.  She wanted to do it herself.  Beforehand we talked about what would happen and why.  If you're adventurous, try this out on several brands of soda.  Is there a difference?  Is there a difference between diet soda and regular soda?  

Science education and explosions are the perfect combo!


Monday, June 18, 2012

The Science of a Campfire

To conclude an amazing Father's Day yesterday, my family and I built a fire in the portable fire pit and made smores.  I didn't fully realize this until later in the evening, but a campfire presents the perfect opportunity to share science with your kids.  My oldest daughter asked why I was cutting up little pieces of wood from the bigger logs.  I was able to explain to her that it's easiest to build a fire starting with small twigs/kindling.  Once the fire gets started you add slightly larger twigs, then medium sized logs, and finally a large sized logs.  She watched me blow into the fire when I was working on getting it started.  Another excellent science opportunity, this time explaining that a fire needs oxygen to burn.

Our fire, early in the evening.
I love watching camp fires.  There's something about the way the flames move and the glow of the embers under a dark sky that mesmerizes me.  After the kids went to bed, my wife and I kept the fire going for a couple of hours and it was during this time that I realized there's so much more science in a campfire.  Why does the wood turn gray/black?  What are coals and why do they glow red?  Where does the light come from?  What is that popping sound?  What happens to the wood?  These are just a few things that I hope to teach my daughter at some point in the future.

If you don't have a science background and aren't sure where to start, do a Google search on the questions above.  You'll be amazed at how quickly you'll learn the science of a campfire.

Sunday, June 17, 2012

Happy Father's Day!

Happy Father's Day to all dads out there.  I hope you're having as good of a day as I'm having.  We're not doing anything special, just hanging out together.  My daughters and wife gave me a gift, followed by nap/rest time where my oldest daughter and I watched a couple of episodes of MythBusters.  Later tonight my lovely ladies are making my dinner of choice.  Nachos with locally produced ground beef and homemade salsa fresh from last year's garden tomatoes and peppers  Yummy!

Friday, June 15, 2012

The Bouncy Egg Finale

Three days ago my daughter and I put an egg (regular, not hard-boiled) into a jar of vinegar.  To be honest it was apple cider vinegar since we ran out of regular vinegar.  Two days ago we replaced the old vinegar with new.  Today it was time to take the egg out of the vinegar and observe the effects.  Below is a picture of our vinegar soaked egg on the left and another egg from the same carton.

Left - Vinegar soaked egg.  Right - egg from same carton

There are a couple of clear differences which my daughter and I discussed.  She immediately picked out the color difference.  The vinegar ate away the outer shell.  The other difference is size.  The vinegar soaked egg is larger!  We both thought this was very cool.  The vinegar soaked egg felt rubbery and did indeed bounce when dropped from a few inches above the counter top.  I planned on showing a video, but my daughter got a bit ambitious and squeezed too hard when picking it up.  No harm though.  We saw it bounce and my daughter proved to everyone reading this that the yolk of the egg is not hardened or thickened in this process.  Below is the leftover mess when the egg broke.

Broken vinegar soaked egg.  Messy!

"Shell" created by vinegar.
The brownish thing in the second picture is not the original egg shell.  It's a second "shell" created by the vinegar soaking process.  It's very fragile as we quickly found out.  

To conclude, this was a very cool science project for my 5 year old daughter.  All that was required was an egg, vinegar, a jar, and 3 days worth of patience.  It's a fun activity that I would definitely recommend to you and your kids.  

Thursday, June 14, 2012

North Carolina Trip Part II: The Wildlife

One of the many things my daughters noticed on our North Carolina beach vacation was the different wildlife. Living in a landlocked state we don't see too many aquatic animals in the wild.  Not the case on the ocean.  On the one rainy day of our trip we went to the Pine Knolls Aquarium.  Everyone on the isle had the same idea as us so the place was swamped, but we had a great time.  It was cool talking to my daughters about aquatic life they had never seen before.  My little one really enjoyed the penguins.  She got a kick out of the penguin who was scratching his belly with his beak.

Now we all expect to see different fish and animals at zoos and aquariums but we don't always expect to see new life in the actual wild.  The beach itself was full of life.  A few of the shells my older daughter found had small crabs (hermit?) in them.  Then there were the sand fleas.  We noticed these the first day but had to google what they were.  We worked hard on catching them.  The little buggers are washed up by the waves but quickly bury themselves in the wet sand.  The bigger ones bury themselves quickly.  This picture of  sand flea I grabbed from the web.  I didn't have my camera with me at the time.  We later discovered that an easier way to catch a sand flea is to walk to the shore line and scoop your hands into the sand.  As your fingers burrow down, you'll feel their somewhat hard shells.  With every scoop of wet sand you'll likely have at least one large sand flea.  My older daughter thought they were cool and we collected several (and a few small fish) in a bucket of water and sand.  We released them before leaving.

Smithsonian Environmental Research Center [CC BY (https://creativecommons.org/licenses/by/2.0)]

Another cool sight occurred on a kids eco-adventure trip to a small island.  At the shore of the island we saw two horse crabs in the process of mating.  This I was lucky enough to catch on my own camera.  The guide who was with us caught a jelly fish that we were allowed to touch.  Very rubbery feeling.  Unlike with the sand fleas, my daughter was a bit too tentative to touch the jelly fish.  It scared her a bit.

In addition to these we saw several dolphins from the deck of our beach house on multiple days.  While geocaching we scared a deer that surprised us and ran in the other direction.  In the end this was an excellent trip that introduced my daughters to many different animals/fish.  Even I was surprised at what we saw.  Sometimes the best science comes unplanned!  So the next time you take a vacation, pay attention to your surroundings.  You might see something cool that you've never seen before.

Wednesday, June 13, 2012

Rocket Launch

This morning/afternoon my daughter and I had an awesome time building a rocket and launching it a few times.  Model rockets are an excellent way to introduce kids to space science.  There are several companies that sell model rockets at the beginner level, so even if you have no prior experience, it's still easy to do.  My daughter has been waiting for this moment for weeks.  I told her last night we were going to build one the next day and this morning she wouldn't stop talking about it.

I purchased a beginner's rocket from Estes Rockets.  I bought the Tandem-X kit which includes two rockets and a launch pad + controller.  The kit had almost everything we needed.  I also had to purchase a package of wadding to help protect the parachute from burning during launch.  I learned the hard way today that there are few other materials needed.  Five minutes after opening the box we had to head to the local Hobby Lobby for a few supplies.  Wood glue, plastic cement, and an small razor knife were needed.  Once we had those supplies it was easy.  Simply follow the instructions and you can't go wrong.  Once build the rocket looked like this.


We launched it four times today.  We started with a beginner engine.  Although this launch was not nearly as cool as one with a more powerful engine, I'd recommend this route if you haven't launched a rocket before.  It will give you an idea of how the rocket launches and how wind effects its fall.  Afterall, you don't want to go running into a nearby cornfield to retrieve the rocket.  For the second launch we used a middle level engine, and for the third and fourth launches we used the most powerful I could buy in the store (and rated for the rocket).  Here's a video of our launch using a medium level engine.


And here's the video from one of our launches using the more powerful engine.


As I already mentioned, rocket launching is a fun activity for both you and your child.  Start with a beginner kit and make sure to launch from a wide open area such as a soccer field, football field, etc.  Obviously be considerate and make sure others aren't using part of the field.  There's a decent chance that on landing your rocket will travel quite far.

My daughter had a blast and she's already looking forward to building the second rocket.  After the first launch I let her be the one to push the launch button.  She was thrilled to do it each time and even commented later that she pushed the button more than I did!  Our second rocket should be even more exciting.  It has a rated launch height of 1150 feet compared to the rated launch height of 600 feet for today's rocket!

Tuesday, June 12, 2012

The Bouncy Egg

Today my daughter and I started the Bouncy Egg experiment.  Before setting it up we talked about eggs and what happens to them when dropped.  Guess what?  They break, making a big mess!  If you put the egg in vinegar for a few days, however, the egg yolk will bounce, or so I'm told.  Details and procedure are found here:

http://www.icanteachmychild.com/2012/05/free-ebook-fascinating-science-for-kids/

It's a three day experiment that begins with putting the egg in vinegar.  Here's our egg:


That's it for the first day.  You see the egg covered in bubbles and the lid of our jar made a cool "pop" sound after a couple of minutes.  Tomorrow we replace the vinegar and wait another 2 days.  On Friday we should have a bouncing egg!  We're both excited!

Monday, June 11, 2012

North Carolina Trip Part I: Ocean Tides

This past week my family and I were vacationing in Emerald Isle, North Carolina.  It was a fantastic vacation and although we didn't specifically set out to find science, it was a vacation full of science.  Science was everywhere!  I would have posted earlier on this, but since I'm not a fan of broadcasting to the world that I'm away from my house and won't be back for days, I decided to wait.  Now that I'm back home I can post about our science experiences.  Given that there were so many, I'll divide them up into several blog posts over the next week or two.  If I combined everything into this post, you'd be reading for the next two hours.

We rented a beach house about 1/2 block from the Atlantic Ocean shore, so we spent at least part of each day on the beach.  One of the first things my daughter noticed was that the beach differed in size throughout the day.  Sometimes when we went to the beach there was a lot of sand, other times, not as much.  I realized this was an excellent opportunity to give her a crash course on lunar tides.  As an astrophysicist I have a clear understanding of how tides work, but living in land locked states my entire life I've never had a chance to directly witness this change.  I was just as amazed as my daughter.

If you're not clear on why we have tides on Earth, let me briefly explain.  Tides are result of gravitational forces between the Earth and the Moon.  Water will "bulge" toward (and away from) the Moon.  Rock also bulges, but not nearly as much.  There's a bit of lag in the bulge, so the height of the tide is not directly toward (or away) from the Moon, but that's a bit beyond the scope of this post.  So if there was no Moon, would we still have tides?  Many people have the misconception that the answer is no, that without the Moon, tides would not exist.  But the truth is that the Sun also plays a role.  The Sun's effect on tides is about 40% that of the Moon. Much less, but still significant.  Thus, even without the Moon, we'd still see ocean tides.

Original: JhbdelTranslation: Gianluigi [CC BY-SA (https://creativecommons.org/licenses/by-sa/3.0)]
As the image above shows, tides are stronger when the Earth, Moon, and Sun are aligned and weaker when they are not.  

My daughter is 5, so I simply explained to her that the Moon causes the water to reach higher/lower levels on the beach.  When she's older we'll discuss it further.  Another thing she noticed regarding high/low tide was the placement of sea shells.  She was very excited about searching for shells.  Depending on the tide, the waves dumped shells on different parts of the beach at different times.  

I thought it was very cool that a vacation to the beach naturally introduced my daughter to science.  And she asked questions which is one of the characteristics of a good scientist!

Tune in later for more vacation science.  

Saturday, June 9, 2012

The Sunscreen Dilema

Anyone with young kids knows that sunscreen + kids = big battle.  Sunscreens have advanced greatly in the last 10 - 15 years.  When I was a kid in the 1980s there was nothing written on the bottle about UVA and UVB spectra.  In fact, most sunscreens did nothing to block the more harmful, skin cancer causing UV rays.  They blocked the less energetic UV rays that cause a sunburn but the deeper skin tissue was still exposed.  In addition, there are now spray-on sunscreens that are much easier to apply and save time.

I've explained to my oldest daughter the importance of always wearing sunscreen.  I have the type of skin that has a burn time of about 20 minutes at best.  If I know I'm going to be outside for more than 20 minutes, the sunscreen goes on.  My daughter inherited this same skin type.  My daughter sees this and understands why, so she knows she has to have sunscreen on, but it can still be a battle.  The biggest battle is the face.  She doesn't want the sunscreen sprayed on her face, but her head bobbles around when my wife and I try to rub it on her face.  Then there's the whole "don't get it in my eyes" issue followed by "but you need to put it on your nose!  Sit still!"  :-)  All parents have been there.  My younger daughter isn't as bad.  She sees big sister getting sunscreen on so she definitely wants it on too.  

I'm very glad my daughters have followed our lead and know that sunscreen is important.  Unfortunately today's sunscreens, despite their advancements, are still cumbersome, time consuming, and down right annoying to apply.  In addition many of them leave an icky or greasy feeling on your skin, especially the face.  Even sunscreens labeled "non-greasy" are never non-greasy.  Thus far my favorite sunscreen is Banana Boat's Ultra Defense SPF 85 with Aloe Vera.  It's not perfect.  It still leaves a somewhat greasy feel on my skin, but it's better than some of the other competitors.  


I've also tried Coppertone's Sport Continuous Spray SPF 70+, but I still prefer Banana Boat.  There are many other sunscreens, some of which are more expensive.  I'm tempted to try a few others but always balk at paying a higher price for something that I may not like.  Suggestions are appreciated.

If someone out there invents a truly non-greasy sunscreen spray that kids don't balk at and doesn't sting the eyes, you'll have me as a customer, regardless of the price.  

Friday, June 8, 2012

Geocaching

Geocaching is an excellent activity to help expose your children to the outdoors.  Geocaching is sort of like Easter egg hunting for adults but is very kid friendly.  I took my daughter and my nephew out the other day.  We spent 3 to 4 hours driving around and searching for caches.  My daughter has geocached with me before and loves it.  She's right at that age where she's beginning to understand what geocaching is and is learning some of the tricks to help her find caches.  Both my daughter and nephew were so excited once we got started that I had to set up a rotation on who was allowed to find the cache first and who was allowed to put the cache back in its hiding spot!

If you're not really sure what geocaching is and want more information go to www.geocaching.com.  It's fun and it's free (although you need a GPS unit and gas for your car).

Thursday, June 7, 2012

Science Activities for Kids

While searching the web for science activities for my daughter and I this summer I came across the following website:

http://www.icanteachmychild.com/2012/05/free-ebook-fascinating-science-for-kids/

Here you can download a free e-book of 15 science activities for parents and kids.  Most of the activities require few materials and those materials are relatively cheap.  I'm putting this on my summer-do list for my 5 year old.  I think she'll really enjoy these.  Our plan is to start with the "bouncy egg" next week!  I'll post a picture if it turns out well.

Tuesday, June 5, 2012

Transit of Venus II

It's cloudy at my location so no direct observing of the transit of Venus.  That sort of stinks, but there's not much I can do about the clouds.  Instead, I'm doing the next best thing.  Watching the live streams from various telescopes across the U.S.  Here's a link to NASA's list of live streams:

http://sunearthday.gsfc.nasa.gov/webcasts/mtwilson/

The link directs you to the Mt. Wilson Observatory in California, but there's a map below the stream for you to choose other locations.  I showed my oldest daughter the video at the start of transit, but this coincided with the start of dinner, so she was more interested in dinner.  :-)  I showed her again after dinner and her attention span was a little bit longer.  She picked out the sun and sunspots since these she saw directly through a telescope a couple of weeks ago.  She thought it was neat that the dark circle was Venus, but then she quickly moved on to more interesting things for a 5 year old.  I can't really blame her.  The video doesn't change over the course of a minute or two so once you look at it, there's not much else to see :-)  The image itself isn't all that exciting, but the rarity of the event makes it exciting.  The next transit is 105 years from now in 2117!!!

If you don't get the chance to directly observe the transit or see it on the live stream you can google it for pictures.  There will be thousands.  Here's one example:


The big yellow circle is obviously the Sun.  The dark circle in the upper right is Venus.  The other, smaller, less dark spots are sunspots.

Monday, June 4, 2012

Finding the Moon

An amazing full moon last night.  The best part about it was my daughter saying "Daddy...look at the moon.  It's bright!" This brought a smile to my face.  Even though there's so much going on down on the ground, she takes the time to enjoy the sky above her.  My fingers are crossed that she's still doing this as a teenager.

Saturday, June 2, 2012

Transit of Venus

If you haven't heard, there's a very cool astronomical event taking place on June 5th.  On this evening, the entire U.S. will be able to observe the transit of Venus. This means that Venus will pass directly in front of the Sun relative to us.  If you have access to a telescope you'll see a small dot on the Sun.  This may not seem impressive, but this will be your (and your kids') only chance to observe this event in your lifetime.  If you miss this transit, the next one is in 2117, 105 years from now!!!  Below is an image from the NRAO of the last transit of Venus in 2004.


This is an excellent opportunity to expose your kids to astronomy.  Nothing beats the smile on a child when they look through a telescope for the first time or see something they've never seen before.  Check your local colleges and astronomy clubs for public viewing events.  

Friday, June 1, 2012

Last Day of Preschool

This morning I dropped my daughter off for her very last day of pre-school/daycare.  I'm not sure that it's really hit me yet that she's officially done with daycare when I pick her up this afternoon.  I don't think it will really hit me until she starts kindergarten in August.  I asked her this morning how she feels about her last day.  She said she'll be sad but she doesn't really act sad.  I think she's more excited about our summer activities.  One of our big daddy/daughter activities is rocket building.  It's the first thing she wants to do when our summer vacation officially begins.  I have to admit that I'm super excited about the rockets too.  I haven't build/launched a model rocket since middle school.  We have all of the materials and are ready to go.  Just need to wait for a calm day.